Natural fluctuations in the process
Forging is a manufacturing process in which extreme process conditions occur. First, the semi-finished products to be formed are heated to temperatures of over 1,000 °C, transferred to the press and formed under high force. The components produced in this process, for example car rims or axle parts, are characterized by high quality in terms of their strength because in forging – in contrast to machining – the original fiber flow in the material is not interrupted.
The tools used in forging are subject to extreme thermal and mechanical stresses that lead to regular tool failure. The service life varies to such an extent that it is not unusual in industrial applications for less than 1,000 or up to 10,000 components to be produced from one tool set in a manufacturing process. It must therefore be assumed, that these processes are subject to irregularities, which have not yet been investigated in detail, to which these variations in tool life can be attributed.
Limits of conventional material characterization and (FE) simulation
In order to design robust forming processes, numerical process simulations are usually used and material characterization tests are performed. Using these methods, the Institute of Forming Technology and Machines (IFUM) has been able to show in the past that the cyclic high thermo-mechanical loads on the tool lead to either a reduction or also an increase in the tool hardness in the surface. This correlates directly with the tool life.
Despite the success achieved so far in the validation of the tool hardness and wear simulations carried out, an essential assumption of all process simulations remains untouched. In the absence of suitable process data, it must always be assumed here, that the processes under consideration run in an ideally reproducible manner. Deviations and fluctuations of real process variables can and are therefore not yet be represented in simulations.
Systematic acquisition of critical process data in the forging process
In order to solve this problem, the IFUM is working on the definition and acquisition of critical process data so that the input data for numerical process design can be better adapted to reality in the future. Since the aim is to develop a method that will also support small and medium-sized enterprises (SMEs) in the future within the framework of joint industrial research (iGF), great importance is attached to universal transferability of the approach.
In principle, numerous sensor types and transducers are already available on the market for many measurement tasks. Especially when several sensor types are used simultaneously in the process, significant costs quickly arise in terms of setup time and equipment procurement, which have often stood in the way of industrial implementation to date. The IFUM’s approach is to investigate which process variables are relevant for estimating the service life and can be reliably measured at the same time. For this purpose, the forming path, the press force and the temperature at several measuring points or components were selected as the output.
IFUM develops mobile measuring system for data acquisition
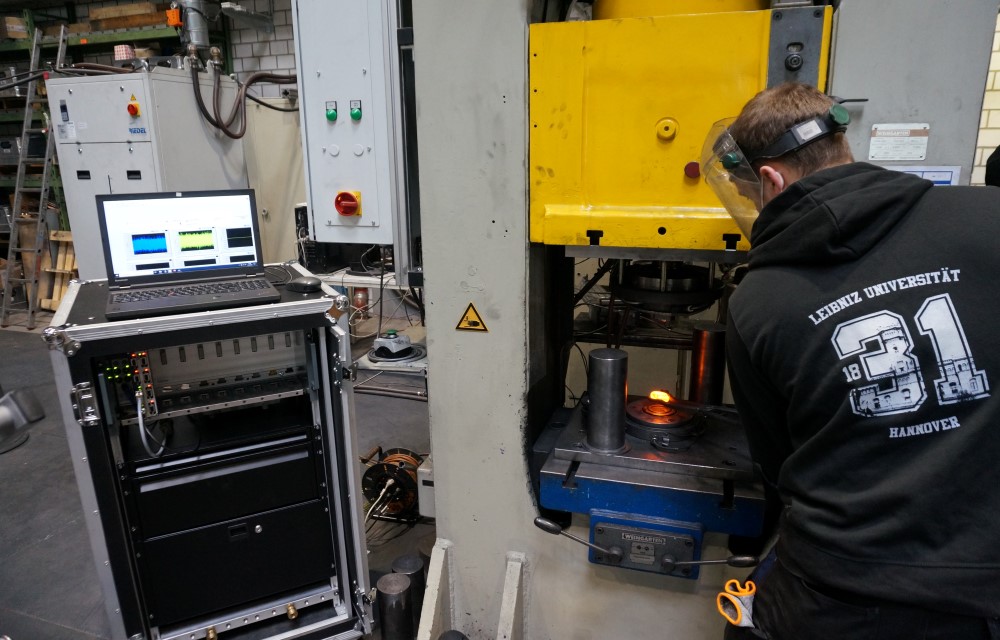
In order to be able to compare process data across presses, the researchers at IFUM decided to develop a mobile measuring cart in which all components can be integrated in a protected manner and used flexibly.
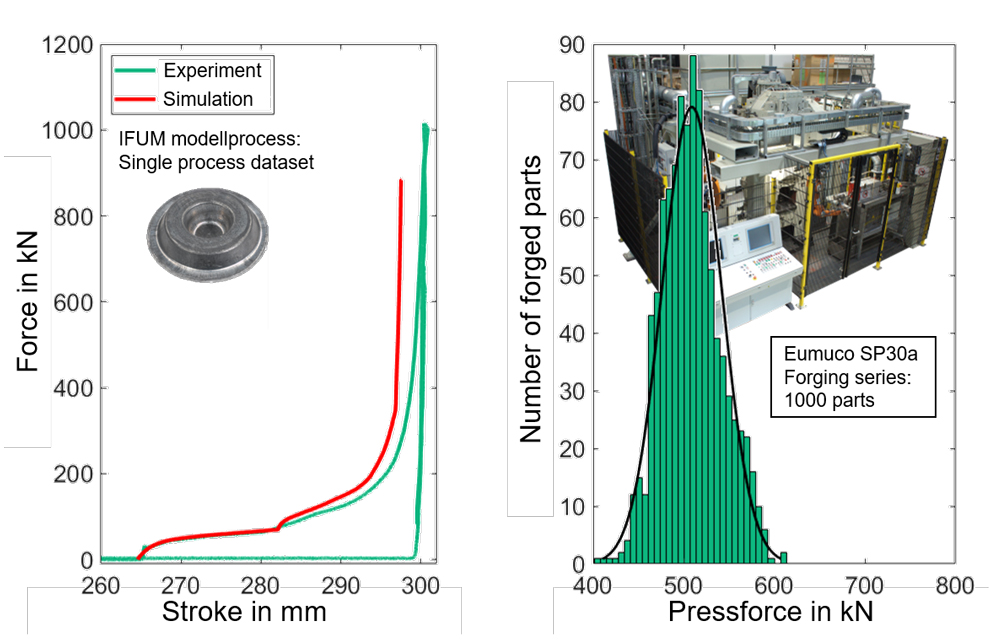
In initial practical applications, the assembled measuring system proved to be extremely flexible and powerful. During initial test series on the Weingarten PSR 160 screw press (see Fig. 1), for example, basic individual part forming operations could be recorded in detail and synchronized in time thanks to high measuring frequencies of up to 40 kHz, and compared with the results of numerical simulations (see Fig. 2, left). Thanks to high agreement, the quality of the measurement technology set up was fundamentally demonstrated. Using the same equipment, it was also possible to record series tests lasting several hours while producing over 5000 parts on the fully automated forging cell around the Eumuco type SP30a eccentric press.
The measuring system is so powerful that the measuring frequency of over 40,000 measuring points per second does not have to be reduced at first, even for a continuous measurement. Later during further evaluation a feature extraction is carried out from this loss-free recorded signal in order, for example, to be able to clearly map the fluctuation of the maximum force over the entire process (see Fig. 2, right). Thanks to this procedure, it is still possible to identify conspicuous production stages afterwards and to investigate them in more detail, for example with a simulation comparison (see Fig. 2, left).
Outlook: Intelligent process monitoring in real time
In future work, the data from the individual tests as well as the series tests will form the basis for building modern feature-based data models (e.g. neural networks) or improving the prediction accuracy of FE simulations by more precise adjustment of the input data.
In the long term, IFUM’s goal here is to install intelligent process monitoring directly at the forming press, which would allow critical process data to be recorded and evaluated in real time and assessed with regard to the remaining service life of the installed tools. On the one hand, this would allow process costs to be saved directly through more precise planning of maintenance intervals. On the other hand, this data can be used to improve the manufacturing process itself by increasing the overall tool life through suitable countermeasures.

