For many technical products, the quality of the surface plays a decisive role for the functionality and efficiency in the subsequent application – for example in implantology or optics. Implants with too high a surface roughness, for example, can cause unwanted reactions. In the case of optical lenses, the rougher the surface, the greater the proportion of scattered light.
In order to increase the surface quality, a finishing process is therefore often added to the shaping process. In machining, such processes fall into the area of grinding and polishing. Tools that can be used for this purpose and that are compatible with common machine tools are usually manufactured at great expense in single-item production. This is not very cost-efficient.
From single-item production to batch production
Scientists at the IMPT of Leibniz Universität Hannover are therefore developing a so-called batch production, which is the production of several identical parts in one process. This can be achieved with the help of a microtechnological process chain. This also has the advantage that even the smallest structures can be created. These, in turn, are particularly suitable for machining the surfaces of microstructures.
Since copper, with its good thermal, electrical and optical properties, is of great technical relevance, the IMPT scientists are testing the functionality of the micro-grinding tools on this material.
Manufacturing process of the micro-grinding tools
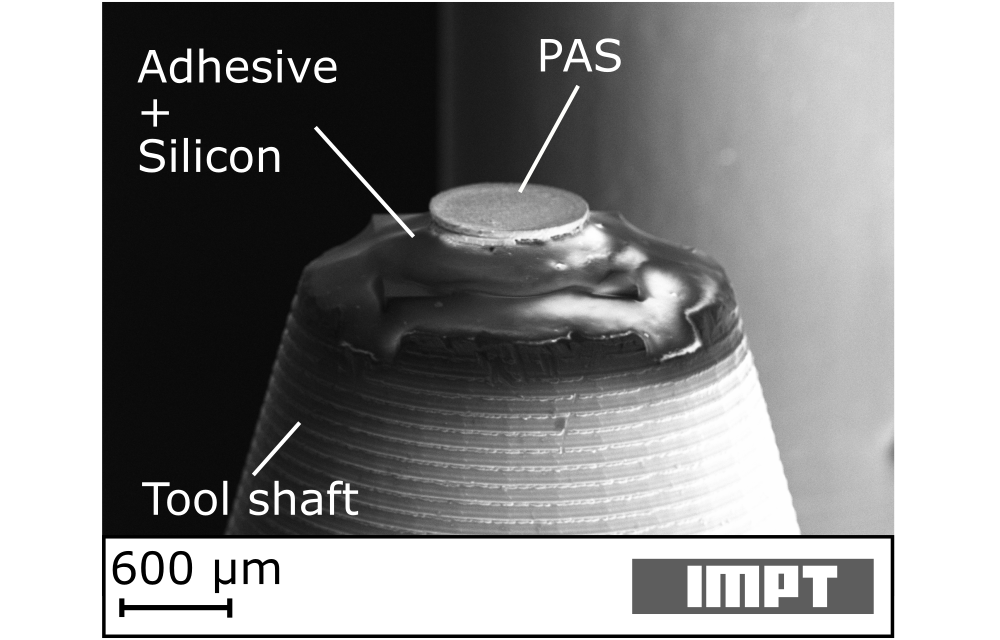
The developed micro-grinding tools have a two-part design: they consist of the tool shaft and the tool head.
The tool shaft is made of aluminium. The variable diameter of the shaft can be adjusted so that it can be used in standardized tool holders. In addition, the tool shaft has a pocket on the upper side, which helps to center the tool head during the subsequent bonding process.
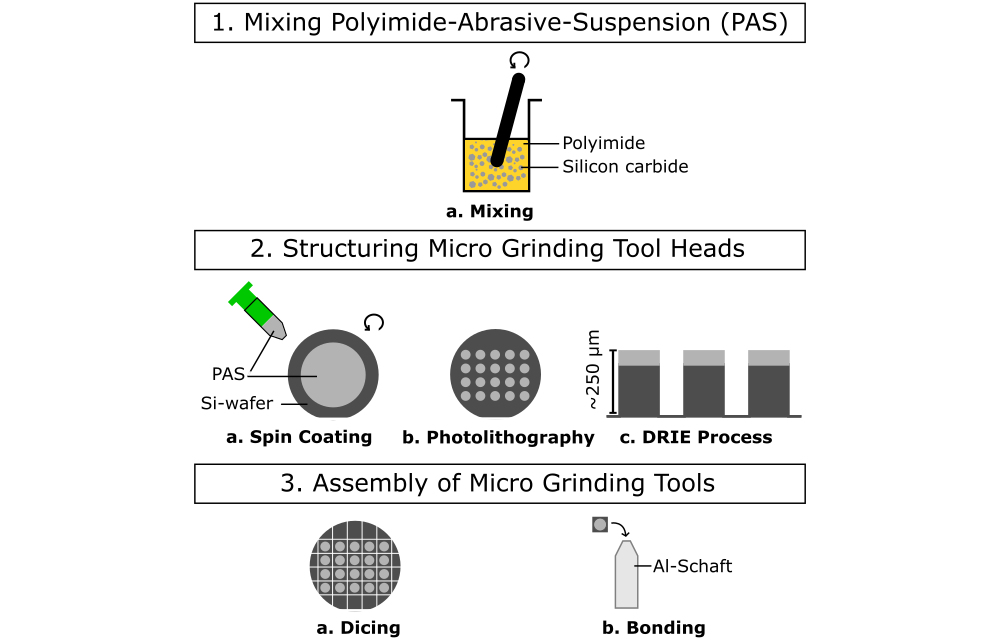
The tool head is batch-produced using photolithography. For this purpose, liquid polyimide precursor and silicon carbide particles are first dispersed. The polymer later serves as a flexible bonding matrix, and the particles, with an average size of 4-6 µm, serve as abrasive. The polyimide-abrasive mixture (PAS) is then rotationally coated onto a silicon substrate. By means of exposure and development, the photosensitive polyimide is patterned so that several hundred circular structures remain on the substrate – each with diameters of 1 mm. Subsequent reactive ion deep etching gives the structures a cylindrical geometry with a height of about 250 µm. Finally, the structures are separated by dicing.
In the final step, the tool head and shaft are bonded by means of two-component epoxy resin adhesive.
Application behaviour when grinding copper
The researchers at the IMPT are evaluating the application behaviour of the tools by means of the finishing of copper surfaces. Their behaviour during the grinding process is analysed. This includes optical inspection of both the tools and the workpieces, as well as determining the surface quality of the workpiece by means of roughness measurements. For comparability, both are carried out before and after grinding.
It is found that the etching process attacks the polymer superficially, favouring high initial wear because many sharp abrasive grains are only weakly bound in the polymer matrix on the surface. This accelerated self-sharpening process also leads to a relatively large metal removal rate and to a strong improvement of the copper surface.
The highest surface quality is achieved in a multiple grinding process. Here, the same area is repeatedly machined with the tool, which further reduces the surface roughness after each grinding process. In this way, a surface that initially had a mean roughness value Ra = 260 nm and a mean roughness depth Rz = 6.99 µm can be improved to Ra = 38 nm and Rz = 2.40 µm. The roughness values were recorded using confocal microscopy.
Further research for even higher surface qualities
The results obtained so far are already very promising with regard to the finishing of metallic surfaces. However, in optics, for example, both mean roughness values and mean roughness depths are required that lie in the range of one tenth of the wavelength of the light used – this is typically a low two-digit nanometre range. For example, the refraction of light in lenses succeeds without high scattering losses.
Therefore, there is still potential for development in the manufacture of micro-grinding tools and the actual grinding process. Smaller abrasive grains should further reduce the surface roughness values Ra and Rz and thus produce a higher surface quality. In addition, copper as a material is very ductile and shows poorer machinability compared to aluminium or brass. By converting the surface to the more brittle oxide form, an increase in machinability can be produced, which can lead to higher surface qualities during the grinding process. For this purpose, chemical processes are being researched at the IMPT that allow oxidation directly in the machine tool.

